Custom Reports - Report Viewer
The K2 Report Viewer executes the report request and generates the report data. The Report Viewer offers the user tools to customize and export the report.
 |
It is important to note that Microsoft Report Viewer 2008 SP1 Redistributable is required in order to view the K2 reports. This can be found in the following location: http://www.microsoft.com/downloads/details.aspx?displaylang=en&FamilyID=bb196d5d-76c2-4a0e-9458-267d22b6aac6 |
The Report Viewer is opened when:
- A report is generated from the Report Designer screen
- When the Report Wizard completes and the report is opened
- The Preview button in certain wizard screens is clicked
- The View My Report link is clicked on the Finish screen of the wizard
- The Save or Save As buttons are clicked

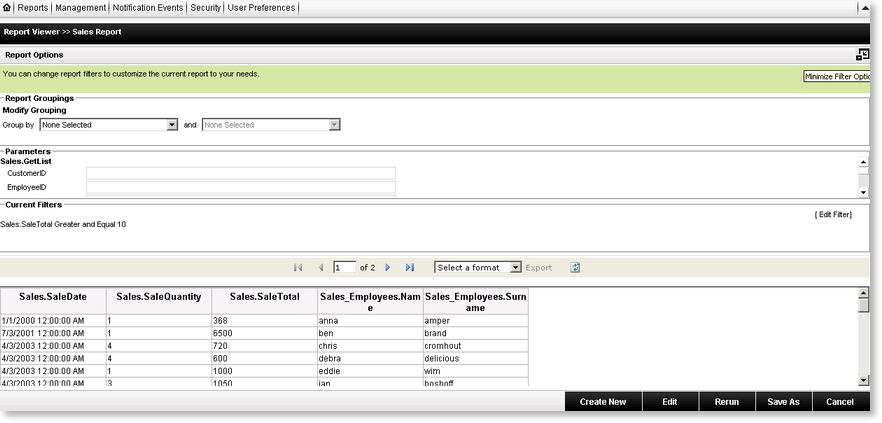
Fig. 1. Example of a Report Viewer for a Tabular report
 |
The Filter Options icon in the top right hand corner is minimized by default. Click the icon to view the filtering detail |
 |
The SmartObject Filter feature can be applied to SmartObjects to reduce the number of records returned when dealing with large volumes. See K2 SmartObject Filter for more detail |
| Feature | What it is | How to use it |
|---|---|---|
| Report Groupings | Lists the SmartObject properties. The Report allows two columns to be selected as the criteria for grouping the report data. Groupings are temporary while in the Report Viewer. As soon as the report is executed again, the groupings will have to be re-applied if required | Select a column name from the Report Grouping drop down list to group the data and click Rerun |
| Parameters | Enables the user to specify parameters if the SmartObject requires specific parameters to execute. Parameters can also be used to filter data on the fly | Insert a value in the box provided and click Rerun |
| Current Filters | Enables the user to configure the report to only display the relevant data by applying standard date, interval or advanced conditional filters. The filter section will only be available if a filter was applied when the report was created | Click Edit Filter in the Current Filters section. The report will open in edit mode on the Filter the data screen of the wizard |
| Report Viewer Toolbar | Enables the user to move to various pages in the report and to export the report into a different application | Select Excel from the drop down list in the toolbar and click the Export link to transfer the report data into an excel spreadsheet. |
| Report Columns and Data | Displays the Report Columns and data | View data |
| Create New | Opens step 1 of the Create Report Wizard for the configuration of a new report | Click on Create New button |
| Edit | Clicking Edit will open the Create Report Wizard allowing the existing Report criteria to be changed | Click on Edit button |
| Rerun | Clicking Rerun refreshes the Report data and column groupings | Click on Rerun button |
| Save As | Clicking Save As opens the Save Report As window allowing the report to be saved to a Public folder | Click on Save As button and supply a location to where the report should be saved |
| Cancel | Clicking Cancel exits the Report Viewer screen. A pop up message will confirm that the exit action is required | Click on Cancel button |
See Also
